
Quick Tip: Where Are My Processed Images?

Where are my processed images?
A common question we receive in our Tech Support department is something along the lines of “It doesn’t matter where I change the output location, the images are going to some other folder!” At first glance everything seems to be set up correctly, yet often times it’s a simple setting that can be easily fixed. Here are the two most common places to check:
The Session Output Folder
One particular culprit that can send our images into no-man’s-land is the Output Location tab on the output module. It is tempting to change this to the particular folder to where you want it to process your images. What many people don’t realize, however, is that changing the Output Location actually changes the Output folder for the entire Session. You aren’t simply picking a folder to output to, you’re changing the designated Output folder for the session. Here’s where that can get tricky.

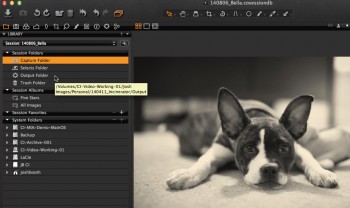
On the Library tab, at the top you will see Selects, Output, Trash, and optionally Capture. These names won’t change – they aren’t necessarily the names of the folder, they represent types of folders. So if it says “Output” in the Library tab, the folder could be named “Output” or it could be named sometime entirely different like “Sam” or “Wentworth.” Furthermore, if you click on the drop down menu for Output Location, you might see several options for “Output,” which can just lead to more confusion.
Bottom line: Make sure that this Output Location is pointed to the correct output folder for your session.
The Recipe Settings – File Tab
The other usual culprit is in the recipe itself. Under the Process Recipe (singular) module in the Output Tool Tab, you should see tabs for Basic, File, Adjustments, Metadata, & Watermark. The tab we want is the File tab.
Here we have a few options: a drop down menu for Root Folder, and optional entries for Sub Name and Sub Folder.
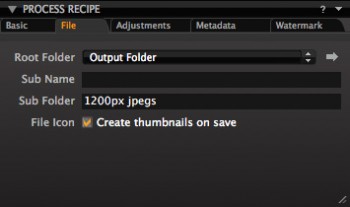
What you enter in Sub Name will be added to the file name if you have the Sub Name token added to the Output Naming tab (ie “Img0001.crw” could become “Img001-800px.jpg”).
Sub Folder will automatically create a subfolder in the output directory with the name you give it. In my example, it will create a 1200px jpegs folder in my output folder, which makes it easy to separate full size jpegs from web-ready jpegs later. However, the thing to check here is the Root folder – and look closely!
By default, there are three options: Output Folder, Image Folder, and Choose Folder.
Root Folder: Output folder
Output Folder refers to the output folder of the session you currently working in – which you can tell by the name of the .cosessiondb file at the top of the screen. This folder will be (and should be) different for each session you create. And as we previously discussed, it’s easy to change the output folder for the session by using the Output Location tab… so check that first. However, a common mistake is people may glance at the Root folder and it will just say “Output”. This is a specific folder name and not the Output Folder for the session, most likely because a specific folder was chosen for this recipe previously.
Bottom line: “Output” is not the same as “Output Folder” and is most likely why your images aren’t showing up where expected. Change this back to Output Folder (after verifying your session’s output folder is set correctly) and process again.
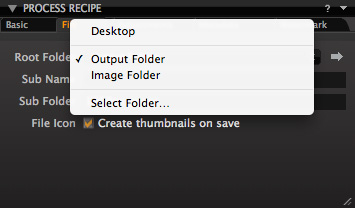
Root Folder: Image Folder
Image Folder refers to the folder of the image being processed. In other words, if you process an image with Image Folder as the Root folder, the processed image will end up in the same folder as the RAW file. This can be handy if you want to process images for editing in Photoshop, and want the final result sitting in with the rest of your other RAW files for mass output later.
Our advice for simple, worry-free output:
- Work in Sessions – they are designed to be nice and self-contained.
- Don’t change the Output folder from its default setting. It can get really confusing really quickly.
- Set the Root folder to Output Folder and use your recipe settings to designate sub folders within your output folder.
- If you need to process to a specific location outside of your Session folder (or perhaps you want to process to another directory for backup purposes, etc.), create a recipe specifically for that purpose / location. For example, I have a folder on my computer specifically for images that are going to my web portfolio called “Web Prep” and my recipe will process to that folder specifically, not my session’s output folder.
- Make sure you are working in the right session… check the name at the top of the window. You might be looking at and working on one session’s images, but be working in an entirely different session!
Bonus Tip:
If you need to verify a folder location or you just simply want to quickly access that folder, click the large arrow to the right of it to open that folder in the Finder or Windows Explorer!
Questions?
Don’t hesitate to reach out to us! Contact our technical support team for questions or additional information!

